Computing Services: MIE Account | Software | Printing | VPN | SendFile
It is possible to print to the department's Ricoh copiers via the MIE research network after the appropriate driver has been installed and configured on a computer. The copier(s) will appear on your list of printers as any other printer would. You will have the ability to print directly to the copier, or to its internal hard-drive for later retrieval.
Alternatively, the copiers support PDF file printing from USB memory devices, which would not required network connection or driver installation.
PIN required:
A unique assigned PIN number is required to use the copiers.
New Faculty and Staff can obtain the PIN from the reception desk at the MIE main office (email: mie.reception@utoronto.ca). Graduate students should contact their supervising professor. Undergraduate students do not typically have access to the research network and the copiers.
Copier locations and models:
When downloading printer drivers, search for the following models at www.ricoh.ca
- Mechanical Building (MC111): Ricoh IM 8000
- Rosebrugh Building (RS212): Ricoh IM 5000
- Bahen Building (BA8116): Ricoh IM 5000
USB Printing:
The copiers support printing PDF files directly from a USB memory drive, which does not require installing drivers on your computer.
- Save the files you need to print as PDF files and copy them on a USB memory drive.
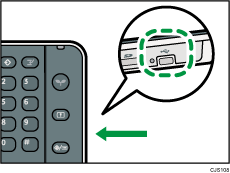
- Attach the USB drive to the Copier

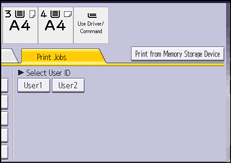
- Select "Printer" and "Print from Memory Storage Device"

- Select your USB drive and the files you want to print and push Start
- Enter your PIN code
- See more detailed instructions (PDF file)
Installing printer drivers for network printing:
Installation instructions for Windows (PDF file).
Installation instructions for Mac (PDF file).
When you print to the copier, you will select the appropriate RICOH printer. The copiers are located in MC111, RS212, and BA8116. Within the printer properties page, you must select the "valid access" tab. In the data entry box, you will enter the appropriate assigned PIN code. Jobs sent to the copier without a PIN, will be ignored.
Secure printing:
As previously mentioned, you can elect to print your document to the copier's internal hard-drive. This is useful if the document's information is confidential. From the properties page, select the "setup" tab. You will see a drop down menu box called "job type" (default is "normal"). Select "Locked Print", then click on the "details" button just below the box. You will be asked to enter a userid, filename, password, and a user name. For example:
USERID: yourname
PASSWORD: *********
Once you have entered the information, click OK. Click OK again to exit the properties page, unless you have other settings you wish to change. On the main print dialog window click OK again to begin sending the job to the copier's internal hard-drive. The job will remain on the copier's hard-drive for up to 3 days, after which it will be automatically deleted by the copier.
When you are ready to retrieve the document, you must go to the copier and select the "Printer" screen and "Print Jobs" button. Select the print job for your USERID from the list, and enter the password you chose when submitting the print job. Press the green "start" button to begin printing to paper. For research related printing, your account will be charged when you print to paper (not for sending the job to the document server). The print job will be automatically deleted from the copier after printing. When finished, do not forget to cancel your PIN session as you would with normal copying.